If you are searching a nice and easy to use tool to work with Java (or any other) project – Gradle was created for it. This is a perfect tool to execute standard operations, such as: compile source code, run tests and build application (jar file).
To make it happened you need to install Gradle (current version 2.6) and go thought the below steps (1 minute of work):
- Check is Gradle works on your machine. In the console execute:
gradle
You should get output similar to this one:
Welcome to Gradle 2.6.
BUILD SUCCESSFUL
- Create new Java project (I’m using IntelliJ IDEA)
My default Java project includes only:
- .gitignore
- README.md
- Add Java source and test directories
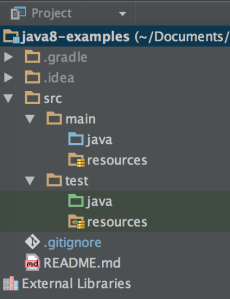
Gradle based on convention and below directory structure is accepted by default:
It’s useful to “color” source, tests and resources directories by “Mark Directory As >” option from context menu on each directory.
- Finally create file build.gradle in the main project directory. Add Java plugin usage.
apply plugin: 'java'
- Check is Java plugin works as expected by executing:
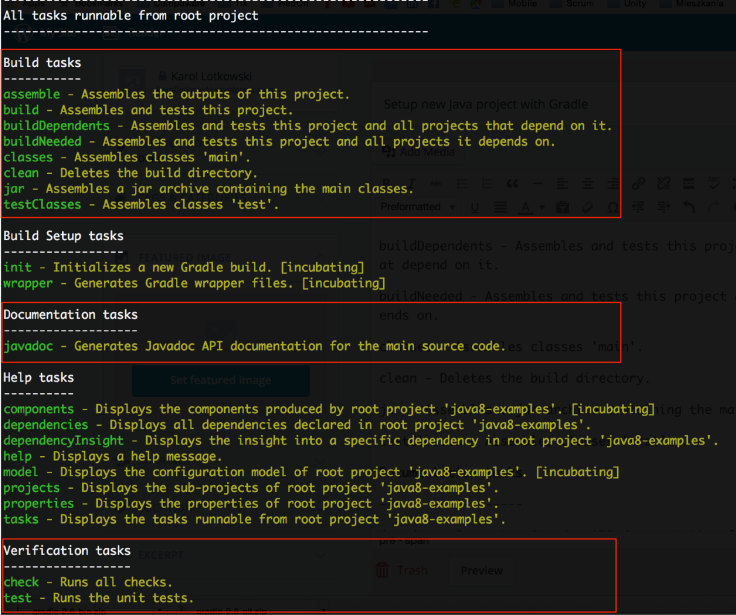
gradle tasks
- There should be 3 new sections strictly related with Java project
- As the last step it’s good to build a project via new Gradle task: build
gradle build
Output:
:compileJava UP-TO-DATE
:processResources UP-TO-DATE
:classes UP-TO-DATE
:jar
:assemble
:compileTestJava UP-TO-DATE
:processTestResources UP-TO-DATE
:testClasses UP-TO-DATE
:test UP-TO-DATE
:check UP-TO-DATE
:build
BUILD SUCCESSFUL
Total time: 3.014 secs
- New build directory should be created in the main java project directory with jar and MANIFEST files.


4 Pingback